Design 2 Raster Images with Photoshop
Try to see the picture above, it's cool ... try if the picture is in our suit ...
Interested in knowing how to print ?, Before you know how to screen, you should have to master how to design a raster image with Photoshop. We learned to design images first,
Ok. Directly slide into Photoshop on your computer each.| Raster image design with Photoshop - T-shirts |
Create a new File then New
We will print with A4 paper size measuring 21.0cm x 29.7cm, please fill the width and length.
Open the desired image, here we use a picture of a spray bottle to open the top picture.
Select the drag by pressing the Ctrl-T button then drag the image into the document that we have set the size earlier.
Select Layer 1 and remove the eye mark on the Background
 |
| activate layer 1 |
When seen in this picture, there are 2 colors: Red and Black, and the way to get raster is by separating the color, how to separate the color, note the following steps:
We take the black color first,
On the menu bar select Select then Color Range, as shown below,
On Select replace with black (Shadows)
 |
| If it has been replaced with black then click OK |
Then when you see the dotted line / flickering on the image, just press Ctrl-J on the keyboard, it will automatically form a colored Layer 2 that we wanted to separate, namely Black.
And now take the red color of the image, first remove the eye mark on layer 2,
 |
| red |
And do the steps like this, but for the red ones, change the Select on the Color Range (Reds). click OK, then press Ctrl-J
Is that raster?
If you do it right then we now get 2 images with different colors, it's not finished because we still have to change it to raster.
Before we go on, maybe someone asks "what is raster?", Raster is an image that is formed into very small dots with a form that can be set, "why do you have to use raster?", Because it gives an easy way to get little dimensions with results look smoother and more similar to the original image.
Ok, we immediately change the image to raster ...
We change the color first
Activate the eye mark only on Layer 3,
Select the Image-Mode-Grayscale menu
When the Marge option box appears, Cancel, Don't Marge. choose Marge
and the picture will be like this
 |
| grayscale results |
Then select the Image - Bitmap menu again
If the box appears with the words Flatten Layer? select OK
And pop up the Bitmap box
 |
| bitmap |
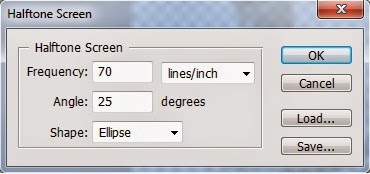
Set Resolution The output is adjusted to the Input, change the Method to Halftone Screen ... click OK

Set the Frequency, Angle and Shape
Frequency to adjust the frequency of the points
Angle to adjust the tilt angle
Shape to shape the dots
click OK
Then the image will appear below, if it is zoomed it will appear a small point that has been adjusted earlier
 |
| seen when zooming |
Save in JPEG format
can read change the Photoshop file format
If it's been saved, don't close / close first because we still haven't changed the black color.
Look to the right of the photoshop screen of the History tab, or choose Windows-History
Look for the Layer Via Copy text as shown below
 |
| HISTORY |
The function of the History tab functions to record our steps when editing in Photoshop
If you do the steps right from the beginning, a black image will appear that we haven't made raster as shown below
 |
| layer 2 |
If it is correct, repeat the steps to change the raster like the one before.
For black color it will be like this
 |
| layer 2 when zooming |
Then save it in JPEG format
Open the folder where you saved the file and we now get 2 colors with raster shapes,
 |
| 2 raster image design results with photoshop - shirts |
On the left for screen printing in red and right for black screen printing.


0 comments:
Post a Comment